Global Option settings can be made by going to Setup > Global Options.
There are 5 Tabs that control Customer settings, which are:
This functionality allows you to create a graphic that can be used when printing A4 Tax Invoices.
The graphic must measure max 710x192px.
The graphic must be saved in the Pictures folder of the Idealpos location - typically located in C:\ProgramData\Idealpos Solutions\Idealpos\Pictures.
Go to Setup > Global Options > General > Invoice Footer Graphic.
There are 3 sections that can affect Customers on this Tab, which are Financial, Promotional Tickets and Magstripe Settings.
Promotional Tickets can be limited to a daily number for Customers and allow to Show Customer Code.
Magstripe Settings can be selected for Customers to use a specific track that has been recorded on the card.
Select the Aging Type for Customer Accounts, 30/60/90+ Days or By Month.
This is the most useful and important section for Customers.
It is split into 7 separate areas each performing different tasks.
These are A4 Tax Invoice, Layby Statement, Account Invoice/Activity Statement, Customer Date Function, Miscellaneous, Laybys and User-Defined Fields.
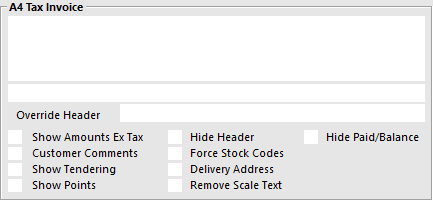
A4 Tax invoice section is where you can enter your information that you want your Customers to have on their Invoices.
Information such as banking details, trading terms, tax settings, tendering and delivery address are available.

Layby Statement section is to display the layby terms and conditions or other information that you would like included when sending statements to Customers.
Account Invoice/Activity Statement section is an area to print out trading terms and other information that you would like included when printing these for Customers.
This function will allow a link to a particular Tender Type using a value entered in a User Defined Text Field.
An example of this would be allowing Staff to spend up to $50 (with a 25% discount) on their Staff Card daily, with all other purchases requiring a different Tender.
To configure this option go to Setup > Global Options > Customers > Tender Spend Limits.
You have to configure three drop down menu selections to trigger the value for each Tender Limit.
Tender Limit 1/2 - Select the Tenders you want the limit to be used against.
User-Defined Field - Select which field you will enter the value against.
Reset - Select how you want the limit to be reset from Manual, Daily, Weekly or Monthly.
While on the Customer tab, change the description of the User Defined Text field to the description you want to use.
Go to File > Customers > Add/Modify > Advanced > User-Defined Fields > Enter a dollar value in the selected field for all required Customers > Save.
Each Customer can have a unique value.
When you have selected to reset the Tender Spend Limits manually, a new option will appear under the Utilities menu of the Back Office.
Go to Utilities > Reset Tender Limit (*tender).
You will need to confirm the Reset of the Tender.
The window will confirm the Tender has been reset.
Customer Date Function area can be used to trigger an anniversary or event using the date fields in the Customer details.
2nd Date Label – Changes the name of the field in the Customer database screen.
Apply the following actions on Birth Date/2nd Date – Sets which date function activates the setup actions.
Continue to apply – Set this to how many days the Customer has to take advantage of the actions from the date set.
Show Message – This will display a message in the middle of the screen when the Customer is added to the sale.
Change Price Level to – Set this to a different level if you wish for the Customer setup.
Subtotal Discount % – Can be set for specific discount.
Sell Item – Allows you to sell a Stock Item. It may be a free item as a gift for the Customer.
Apply actions Once Only – Will apply settings on the one sale for the Customer only.
Miscellaneous section is where you can set options that will be used infrequently, usually behind the scenes.
Default Credit Limit – Enter the amount of credit new customers get by default.
Pay by Points Tender – Select from the drop-down menu.
Default Type – Select from the drop-down menu.
Automatic Customer Import Daily Time – Enter a time where each day new customers will be imported
Customer Import Frequency – Select a time frame to import new customers.
Laybys section is used for defining the Layby terms and conditions that you want to print out on the Layby receipt.
Text Area – Enter the message, terms and conditions you want on the Layby receipt.
Period – Enter the period in days you want to allow laybys to be kept for.
Minimum Deposit – Enter the % value of the total sale required for deposit.
Laybys Become Sales – Select when the stock that has been placed on layby is taken from the stock level.
The User-Defined Fields section allows you to create custom fields for marketing and loyalty purposes.
These fields will change when edited in the Customer setup screen.
Credit Notes can be issued as a replacement for offering a refund and will be tracked and recorded.
Each Credit Note that is issued will automatically add the Customer to the database if they are not already included.
Gift Voucher section allows you to use the Customer Code instead of creating codes not relevant to the Customer within the database.
Customers who use the StarrSrvr membership can be added to the database of Idealpos by selecting Add Members to POS, by using their Membership ID or Scan Code.
They can also be linked automatically to a specific Customer Type.
More information on the details of StarrSrvr can be found in the Global Options > Gaming topic.